Understanding Night Sky Photography
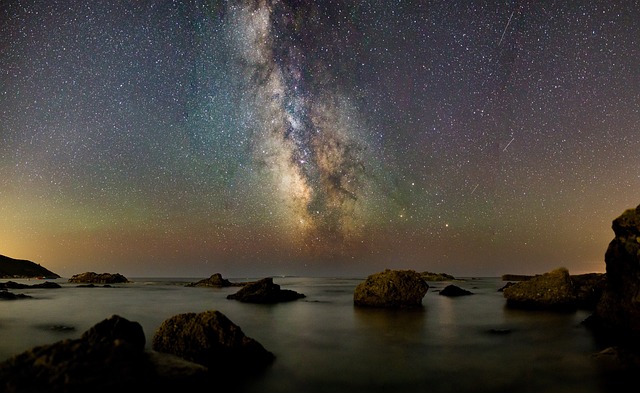
Night sky photography, often termed astrophotography, involves capturing images of celestial objects and landscapes under starlit skies. This genre of photography mesmerizes both amateurs and professionals. Why? It paints a picture of our universe, bridging the gap between art and science in a breathtaking way. The night sky, full of stars, planets, the Milky Way, and occasional meteor showers, calls to many photographers. But, let’s be clear; this isn’t just about pointing a camera at the stars. A successful shot requires a good understanding of the equipment, techniques, and environment. Let’s dive deep into what night sky photography is all about.
First, it’s essential to understand the core elements that define great astrophotography. Consider composition, lighting, camera settings, and location. Each of these elements plays a vital role in capturing that stunning night sky photograph. Take, for instance, location. Choosing a region with minimal light pollution significantly enhances your chances of capturing vibrant stars. Urban areas, characterized by bright neon lights, obscure star visibility. On the other hand, heading to parks or nature reserves can provide that dark blanket you seek. This might sound straightforward, but you’ll soon realize that every ingredient counts when trying to freeze a moment of the cosmos in your frame.
Essential Equipment for Astrophotography
Choosing the right equipment is crucial for anyone eager to explore night sky photography. While you don’t need to break the bank to get started, investing in a few key items can significantly enhance your results. Using a DSLR or a mirrorless camera gives you control over settings, crucial for capturing fine details in the night sky. But that’s just the beginning; your lens choice matters a great deal. Opt for a fast wide-angle lens, ideally in the range of 14mm to 24mm, with a wide aperture (f/2.8 or faster). Such a lens allows more light to reach the sensor, which is vital for those darker environments.
Additionally, a sturdy tripod cannot go unnoticed. Astronomical objects move across the sky, even if we don’t perceive it at our level. Thus, stability becomes paramount. A good tripod prevents blurry images, especially during longer exposures. Also, you may want to consider using intervalometers for shooting multiple frames without having to press the shutter each time. This is important since stacking images in post-processing can reveal incredible celestial details. And don’t forget, a comfortable headlamp with a red filter will help you to navigate your equipment without ruining your night vision! Having the right equipment prepares you for the cosmic dance that awaits in the night.
Mastering Camera Settings
Once you gather all your astrophotography gear, the next step involves mastering your camera settings. Night sky photography showcases the beauty of celestial bodies but requires a unique approach to settings. Start with the basics: use manual mode. This mode allows complete control over exposure, ISO, and aperture. Set your aperture as wide as possible; a wide-open f/2.8 captures more light, crucial for dimmer celestial bodies. For ISO, select a value ranging between 1600 and 3200. Higher ISOs capture better details but come with noise, so it’s always a balancing act.
Shutter speed also requires consideration, as it can lead to star trails or pinpoint stars. A great starting point is the “500 rule”: divide 500 by your lens focal length to determine the maximum shutter speed in seconds without noticeable star trails. Lastly, focusing at night could be tricky. Use Live View and zoom in on a bright star, manually adjusting the focus until the star appears sharp. Following these steps allows you to translate your artistic vision into the realm of the celestial world clearly.
Choosing the Perfect Location
Location plays a crucial role in night sky photography, making it both exciting and challenging. The best locations are often those far from city lights, where darkness reigns. However, picking the perfect spot can be an adventure in itself! Research areas that are known for minimal light pollution. You can utilize apps and websites that provide information about light pollution and popular astrophotography spots. National parks or elevated terrains can be particularly beneficial, as they offer expansive views and reduced light interference.
But don’t merely focus on keeping your distance from city lights. Also, consider accessibility and safety. Some remote locations may seem inviting during the day, but nighttime exploration can become hazardous without proper planning. Always scout your chosen location beforehand. Familiarize yourself with the terrain. Additionally, scouting helps you visualize your shot, including the foreground elements like trees, mountains, or water, that can help create depth in your photograph. So, strap on those hiking boots, and seek out that perfect vantage point; the cosmos is waiting for you!
Creative Techniques in Night Sky Photography
While capturing beautiful stars and celestial bodies is thrilling, allowing creativity to flow can transform a good night sky photograph into a masterpiece. One popular method among astrophotographers is including foreground interest in the frame. Think about silhouettes of trees or reflective water bodies. These elements can offer contrast and draw the viewer’s eye into the photograph. Creating layers adds depth; this visual intrigue often engages viewers, connecting them to your vision. Consider also experimenting with multiple exposures or light painting for an artistic touch. This technique allows photographers to add their creative flair, turning an ordinary shot into something uniquely their own.
Another fascinating technique is star trails photography. It captures the apparent movement of stars across the night sky, creating beautiful arc patterns. To achieve this, you may need to leave the shutter open for an extended period, sometimes for several minutes. Combine several images in post-production to enhance this effect further. Ensure you have a plan because star trails create a different kind of shot than sharp, pinpoint stars. The veil of the night sky holds endless possibilities, and stepping outside of your comfort zone can lead to remarkable results.
Post-Processing for Stellar Results
After capturing stunning images, your journey doesn’t end there. Post-processing takes your night sky photographs to new heights. Software like Adobe Lightroom and Photoshop can help you make significant enhancements. Start with basic adjustments, such as cropping and exposure. Boosting the contrast can bring the stars to life against the dark backdrop, while reducing noise helps in eliminating grain from longer exposures. You might also want to apply selective adjustments to enhance colors or tonality in the night sky, creating a more inviting visual.
Consider blending techniques as well. This process involves stacking images taken in sequence, resulting in a cleaner image with less noise. Programs like Starry Landscape Stacker or DeepSkyStacker are fantastic for this. Also, interestingly, photomerging can be used to create a panoramic view of the sky. These techniques do require practice, but as you navigate through them, your skills and confidence will grow. Remember, post-processing is about enhancing your original vision while maintaining the integrity of the beautiful night sky you laid your eyes upon!
Conclusion: Embrace Your Night Sky Photography Journey
Venturing into night sky photography opens a world of limitless possibilities. Whether you aim to capture the Milky Way or the twinkling of countless stars, each photograph narrates a story of the cosmos. Armed with the right knowledge, techniques, and a little creativity, anyone can venture into the night and produce breathtaking images. Remember to enjoy the process and appreciate the journey as much as the result. Photography is about expression, and the night sky offers an abundance of inspiration, just waiting for you to seize the moment. So grab your camera, plan a trip to a dark sky location, and let your creativity shine amongst the stars!
FAQs
1. What camera settings should I use for night sky photography?
Use manual mode, set your aperture to the widest setting (f/2.8 or wider), adjust your ISO between 1600 and 3200, and apply the “500 rule” to determine the maximum shutter speed. These settings will help you capture the best quality image of the night sky.
2. Do I need a special lens for astrophotography?
Yes, a wide-angle lens with a fast aperture is recommended. A focal length between 14mm and 24mm with an aperture of f/2.8 or faster helps capture more light and achieves better results in low-light conditions.
3. How can I reduce light pollution when photographing the night sky?
To minimize light pollution, scout for locations at least 30 miles away from urban areas. Use light pollution maps to find dark sky locations, typically national parks or elevated terrains, which can provide a clearer view of the stars.
4. What techniques can I use to enhance my night sky photos in post-processing?
In post-processing, enhance your images by adjusting exposure, contrast, and colors in software like Lightroom or Photoshop. You can stack multiple images to reduce noise and improve clarity, and use cropping for better composition.
5. What is star trails photography, and how do I achieve it?
Star trails photography captures the apparent movement of stars, creating beautiful arcs in your photo. To achieve this effect, use longer exposure or combine multiple long exposures in post-production to show the star’s paths across the sky.


